
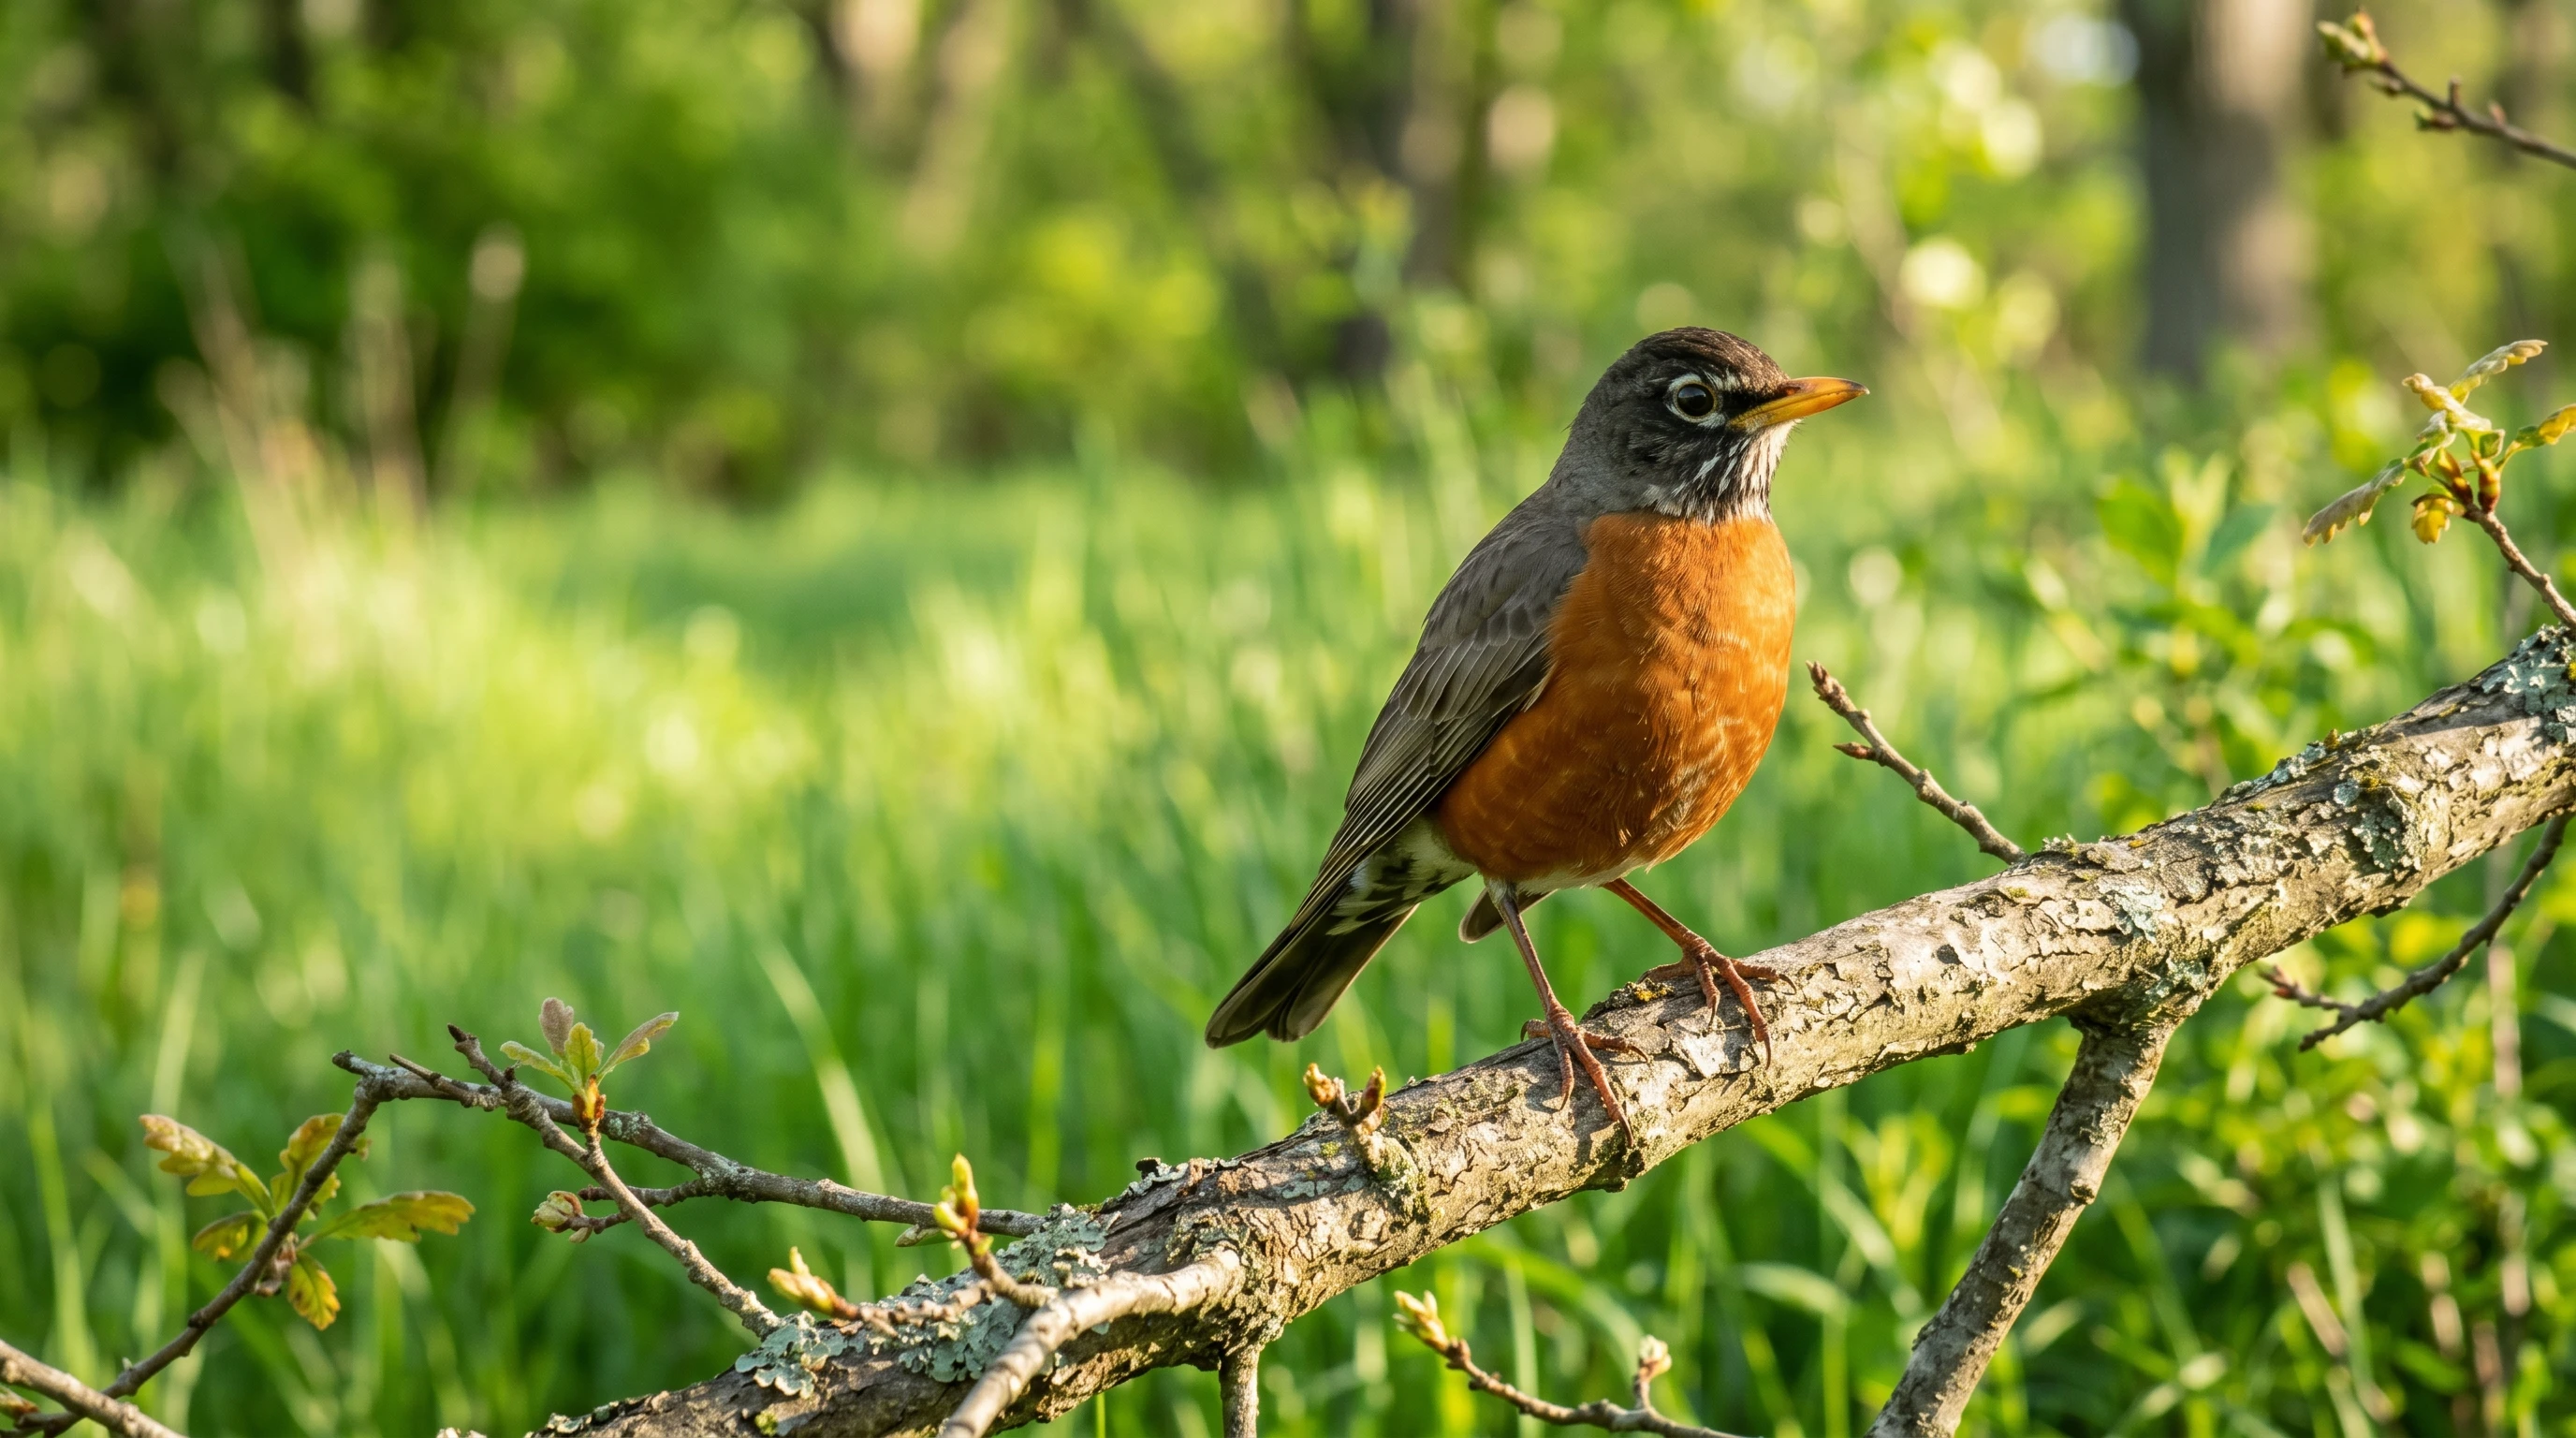
If you want to photograph the American Robin, having a game plan makes all the difference.
My favorite approach involves starting early in the morning or waiting for the golden glow near sunset, setting my shutter speed around 1/1000 to 1/2500, focusing tightly on the eye, and using a telephoto lens somewhere in the sweet spot between 300mm and 600mm.
I always try to either approach slowly or stay put and shoot from a distance so I don’t spook them, and I keep an eye out for that classic robin behavior, like hunting worms on lawns.
Robins are actually great subjects for anyone new to bird photography because they are common and not super shy, but nailing sharp, beautiful photos does take a bit of timing, patience, and thinking about your shooting angle or position.
Why the American Robin is Ideal for Beginner Bird Photography
Robins make bird photography super approachable.
They are everywhere, from my backyard and city parks to garden hedges, so I do not spend hours scouting rare species.
Their predictable feeding habits are another bonus.
Most mornings, you will find robins on lawns, tugging little worms out of the earth, or chasing insects in garden beds.
If you are just getting into wildlife shots, robins are like the friendly neighbour who always shows up for a portrait.
This guide covers the gear and settings that will help you get sharp shots, jumps into robin habits (so you can anticipate great action), and uncovers my favorite tips on light, composition, and fieldwork.
By the time you are finished reading, you wll know how to spot the best opportunities and avoid common beginner mistakes.
Understanding American Robin Behavior
I have noticed that getting familiar with robin routines leads to much better photos.
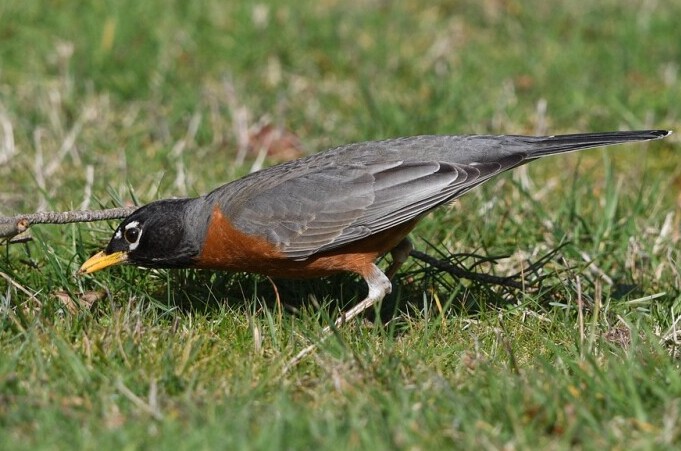
Most American Robins do their foraging right on the ground, moving in short bursts and pausing often to cock their head.
That sideways look is not random—they are actually listening for worms and bugs moving beneath the surface.
When you notice that head tilt, get ready for an action shot as they pounce or tug a worm free.
Robins are bold about defending their patch of lawn, especially if they spot another robin muscling in.
During the breeding season (spring and early summer), they will spend time gathering nesting materials and feeding chicks.
In the fall and winter months, some stick around as lonely individuals, while others form loose flocks, which is great if you want to practice group shots or catch interesting interactions.
Being able to read these signs helps me time my shots and catch the difference between a quiet perch, a worm grab, and territorial displays.
That is always led to more variety and personality in my photos.
Finding the Best Time and Location for Robin Photography
Best Time of Day
Robins are most photogenic at dawn and late afternoon when the light is soft and they are actively searching for food.
In the middle of a warm, sunny day, I have found they take longer breaks or move into shadier spots, which makes everything trickier.
Early mornings tend to bring out more feeding action and the softest light, while late afternoons offer warmer tones and a gentle calm that often encourages robins to forage closer to open spaces.
Sometimes, if I linger as the sun sets, I find robins feeding quietly, making these moments great for more subtle, gentle images.
Best Locations
- Lawns and Gardens: Where I spot the most robins digging for food, especially after rainfall. Moist soil brings worms up, and robins gather eagerly in these spots for easy meals.
- Parks and Urban Green Spaces: Robins feel right at home on grassy stretches away from big crowds. Look for spots with fewer people and minimal noise, as robins prefer to feed undisturbed.
- Forest Edges and Open Fields: In rural areas, check the fringe between the woods and open space. Robins love these transitional habitats, which offer a balance of cover and foraging sites.
Seasonal Camera Opportunities
- Spring: Nest building and lots of food runs for noisy chicks fill the season with energy. You will spot robins carrying bits of grass or worms in their bills, making for classic action shots.
- Summer: Parent robins bustle back and forth to feed fledglings, and you may catch young robins learning to feed or stretching their wings for short flights nearby.
- Winter: The occasional robin flock means more dynamic photos if you catch group feeding or perching. I find winter robins tend to gather around berry-laden shrubs and leaf litter, which adds variety to compositions.
Each season brings a new mood and behavior to photograph, so keeping an eye on seasonal changes helps track down unique shots throughout the year.
Camera Settings for Pin-Sharp Robin Photography
Shutter Speed
I usually set my shutter to 1/1000 for robins that are sitting still, and bump it up to 1/1600 or even 1/2500 when I see feeding or quick movements coming up.
This keeps wiggling heads and snatched worms looking crisp, not blurry.
If you want to freeze a robin in mid-hop, slightly faster speeds of 1/3200 work well. Experiment based on the bird’s activity level.
Aperture
Shooting wide open at f/4 or f/5.6 helps separate the robin from a messy background.
If I want more of the environment in focus, such as showing the grassy setting, I’ will stop down to f/8 and keep a steady hand—or a tripod if I’m feeling patient.
Using wider apertures also creates a smooth, creamy bokeh behind the robin, making the bird stand out even more.
ISO
I try to keep ISO as low as possible (ISO 200 is a nice starting point in morning sun).
On darker days or under tree cover, I would not hesitate to bump it up to 800 or even 1600.
A little noise is easier to edit out than a blurry robin.
If you are shooting with newer cameras, do not be afraid to test ISO 3200 in very low light to maintain sharpness.
Focus Settings
Robins are active, so I flip my camera to continuous autofocus (AF-C/AI Servo).
I always use a single focus point and place it right on the robin’s eye.
That sharp eye makes every photo pop, even when the bird moves suddenly.
When tracking moving birds, I sometimes switch to a small zone focus for extra flexibility, which helps keep the eye in focus as the robin darts around.
Choosing the Right Lens for Robin Photos
Having a lens with reach saves a lot of frustration.
I use a 300mm or 400mm for closer encounters, like robins hopping around my garden.
For more distance or skittish subjects in parks, a 500mm or 600mm is super useful.
Zoom lenses such as a 100-400mm are flexible for fast tracking, while primes offer faster apertures and slightly better sharpness.
Longer lenses let me keep a comfortable distance, so I avoid creeping too close and risk scaring off the bird.
I pick my spot, wait, and let the robin get comfortable before firing off a burst of shots.
Monopods or lightweight tripods can also be handy for longer sessions, especially with heavier lenses.
For those without big lenses, a 70-300mm zoom will do the trick, especially if you shoot from a closer distance or crop during editing.
The key is balancing reach, sharpness, and portability, depending on your own adventure style and location.
How to Get Close Without Disturbing Robins
Move Slowly and Stay Low
Most robins will notice quick movement from far away.
I approach slowly, stop often, and stay below their line of sight if possible, crouching or lying flat works, especially for that dramatic eye level photo.
If you plan to move through taller grass, gentle, steady movement is less likely to startle a robin than sudden shifts.
Use Natural Cover
Whenever I can, I use bushes, tree trunks, or even picnic tables as makeshift blinds.
Sometimes, I shoot from my car with the window down, which turns my car into an instant, mobile “hide.”
Even low fences or tall grass can break up your silhouette and make robins feel safer.
Let the Robin Come to You
If I wait quietly by a well-used feeding patch, robins usually forget about me after a few minutes.
That is when I get some of my most relaxed, interesting shots. Patience pays off, and setting up early allows the robin to approach on its own terms.
Read the Robin’s Body Language
If the robin holds still and stops feeding, or starts stretching its neck and looking nervous, it is time to pause or back off.
Comfortable birds act naturally for better photos. Fidgeting and twitchy movements are signs a bird is on edge, so I always respect their space.
Composition Tips for Robin Photos You Will Be Proud Of
Focus on the Eye
That glint in a robin’s eye adds life to the photo.
If the eye’s sharp, everything else is more forgiving. I set my AF point on the eye each time I recompose.
Reflections in the eye, known as catchlights, give extra personality to portraits and make the robin pop against the background.
Pick Clean Backgrounds
Busy lawns, twigs, and stray garden tools can ruin an otherwise beautiful image.
I scan the viewfinder for distractions and shuffle sideways to keep backgrounds simple, either grass, soft earth tones, or a pleasant blur.
Using shallow depth of field helps turn messy backdrops into smooth washes of color.
Shifting just a few inches can make a huge difference.
Shoot at Eye Level
Lying on the grass might feel silly, but it brings the robin onto your level and creates way more engaging, intimate photos.
This simple trick totally changed the look of my robin shots, and side lighting from early or late sun brings added depth.
Shooting from the ground also helps reduce harsh shadows and flatten unwanted elements.
Include Natural Behavior
I look for unique moments like a robin yanking a big worm, bathing in a birdbath, or gathering grass for its nest.
Including environmental details or captured behavior adds context and story to your pictures.
For added variety, I sometimes photograph robins interacting with other species or reacting to unexpected changes in their surroundings, like a sudden gust of wind or a passing cat.
Lighting Tips for Capturing Robin Colors and Detail
Golden Hour
Early or late sunlight makes robin’s orange breast feathers glow, with softer shadows that flatter details.
Warm tones are especially kind to skin and plumage colors alike.
The golden hour’s lower sun angle produces long shadows and a gentle sparkle on dewy grass, enhancing the mood of the photo.
Side Lighting
Side light brings out the feather texture, nice for when the bird’s preening or fluffed up after a bath.
I try to position myself so sunlight skims across the robin’s body, revealing softness and detail.
When clouds fill the sky, the diffused side light adds subtlety while keeping detail crisp.
Backlighting and Silhouettes
Occasionally, I will shoot with the sun directly behind the robin.
This can create a cool rim light along the feathers or dramatic silhouettes if you expose for the sky.
It is fun for experimenting and often produces next-level cool effects, especially in the early morning mist or with water droplets in the background.
Overcast Skies
Cloudy days mean even lighting with no harsh shadows.
Overcast light can be super useful for detailed close-ups where you want every feather crisp without worries about blowing out highlights.
The muted colors also give your robin shots a moody, storytelling feel.
Capturing Action Shots: Feeding and Robin Movement
I keep my camera ready for the instant a robin tugs a worm, hops, or takes off. Burst mode (continuous shooting) is my secret weapon for getting the shot where the motion is in peak position, like a worm dangling from the beak or an outstretched wing.
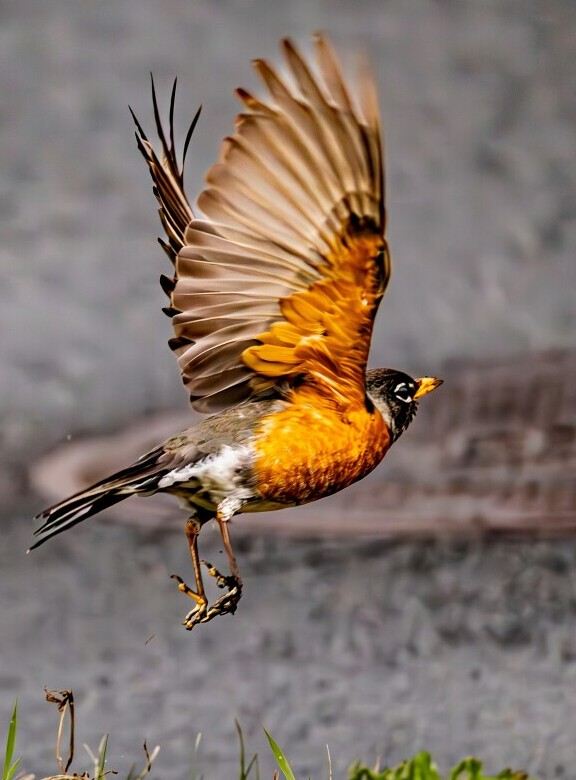
Watching the body language, such as a head cocked down or tension in the legs, signals something exciting is about to happen.
Sometimes, robins jump unexpectedly, and my finger stays on the shutter to catch both calm moments and quick action.
Patience is key, but the results are worth it.
Beginner Pitfalls to Avoid
- Shooting from too high up. Most beginners stand, but crouching or lying down brings shots to life.
- Slow shutter speeds. Motion blur ruins robin photos fast, they simply move too much for anything below 1/1000.
- Messy backgrounds. A cluttered lawn or garden means more editing headaches.
- Getting too close too quickly. Better to shoot from farther away and crop later than scare away your subject.
- Shooting in harsh sunlight. Blown highlights can wash out orange breast feathers and spoil detail.
- Ignoring weather conditions. Mist, light rain, or frost can give a boost to your images, so do not pass them up.
Easy Practice Tips for Robin Photography
- Start in your backyard, where robins are already used to people for more approachable practice.
- Spend ten minutes quietly watching before raising your camera, robins will relax, and you will spot their favorite spots.
- Practice on robins before switching to shyer birds; they are forgiving subjects but still reward good technique.
- Returning to the same patch of lawn helps me learn individual bird routines and score more natural moments over time.
- Try photographing robins in different weather—light fog, rain, or after a shower make for eye catching changes in color and texture.
Quick Checklist for Photographing American Robins
- Shoot early or late for soft light
- Set fast shutter speeds (1/1000+)
- Focus on the robin’s eye
- Pick simple backgrounds
- Shoot at or near bird’s eye level
- Give the robin space and plenty of time
- Stay patient, wait for natural behavior
- Take notes after each shoot to track what works and what does not
Frequently Asked Questions About Photographing American Robins
What is the best lens for photographing American Robins?
For most situations, a telephoto in the 300–600mm range works great, letting you keep a respectful distance while filling the frame.
What time of day is best to photograph robins?
Dawn and late afternoon, when robins are feeding and the light is soft, make for the best photos.
How do I get close to robins without scaring them?
Move slowly, use cover, let the robin come to you, and avoid sudden movements. Shooting from a car or behind a bush works well too.
What camera settings should I use for robins?
Use a fast shutter speed (at least 1/1000), a wide aperture for background blur (f/4–f/5.6), continuous autofocus, and put the focus point on the robin’s eye.
Why Photographing Robins Helps Build Your Skills
Spending time with American Robins is a great way to improve your photography.
They help you nail timing, learn how light affects different feather colors, and practice your positioning for crisper, more interesting images.
Every session builds both technical skill and confidence, and robins always bring a bit of personality to your growing portfolio.
As you get into the rhythm of photographing robins, you’ll pick up transferable skills for other wildlife subjects, from fast-moving sparrows to elusive warblers.
If you want to keep practicing or improve even faster, you might find these related guides handy:
- How Light Shapes Bird Photos
- Capturing Feather Detail in Wildlife Photography
- A Beginner’s Guide to Bird Photography
Did you find this article helpful?? If so please leave a question or comment in the box below and I will be happy to get back to you!!!
Happy bird photographing!!!!!!
Great article on photographing the American robin. I really liked how clearly it explains the importance of patience and understanding bird behavior before even pressing the shutter. The emphasis on getting the right angle and using natural light really stood out to me, especially how small changes in position can completely transform the background and mood of the image. It also made me think about how often people focus only on gear, while timing and observation seem just as important for getting sharp, expressive shots.
When you’re photographing robins specifically, do you find that waiting for natural behavior moments like feeding or singing makes a bigger difference in achieving that “storytelling” shot compared to trying to stage a perfect perch setup?
Hi Hanna,
Thank you so much — I am really glad the parts about patience, angle, and natural light stood out for you.
You nailed it: gear matters less than timing and observation, especially with a common bird like the robin where behavior is what makes the shot unique.
To your question: 100% yes — waiting for natural behavior beats a staged perch setup for storytelling, at least for me.
A perfect perch can give you a clean, sharp portrait. But feeding, singing, pulling a worm, or that head-tilt when they’re listening?
That is where the “story” happens.
Robins are so expressive, and those moments show personality. Viewers connect with that way more than just a pretty bird on a stick.
My approach lately: I’ll find a good light/background area where robins are active, then just wait. If a great perch is there, bonus.
But I would not flush a bird that is singing or tugging at the grass just to get it on “my” branch.
The shot I will keep is usually the messy, real one.
Have you noticed certain behaviors with robins in your area that you would love to capture?
Thanks again for such a thoughtful comment — love talking shop about this stuff.
Best regards,
Ray