
Photographing a kingfisher is one of those wildlife challenges that really pushes your skills and patience.
The results speak for themselves.
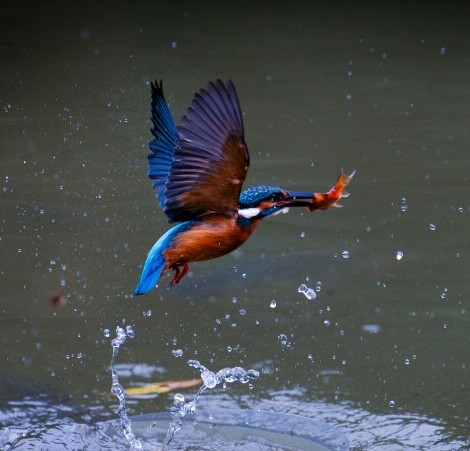
Those electric blues, that sharp beak, and the rush of water as it jumps in for fish can make some of the most eye-catching bird photos you will ever take.
Learning how to capture stunning kingfisher shots starts with understanding their habits and nailing the technical side of your camera.
I am sharing my own field-tested guide to help you get those wow-worthy images with less frustration and more satisfaction.
Kingfisher photography blends the thrill of fast action, beautiful habitats, and the satisfaction of capturing a moment many have only dreamed of seeing.
What Makes Kingfishers So Challenging (But Worth the Effort)
Kingfishers move incredibly fast, and they do not give you much time to react.
Capturing them in motion means you will need to be really on your toes.
Timing, patience, and anticipation are super important—not only to catch the action but to avoid scaring the bird off.
Once you begin learning the bird’s routines, spotting patterns in where and how they hunt, things get a lot easier.
Kingfishers tend to have favorite perches and hunting grounds, so you are not guessing, just waiting for the right moment to snap the perfect photo.
The thrill of nailing the shot makes all the effort worthwhile, especially when you capture the vibrant colors and crisp movements that define these birds.
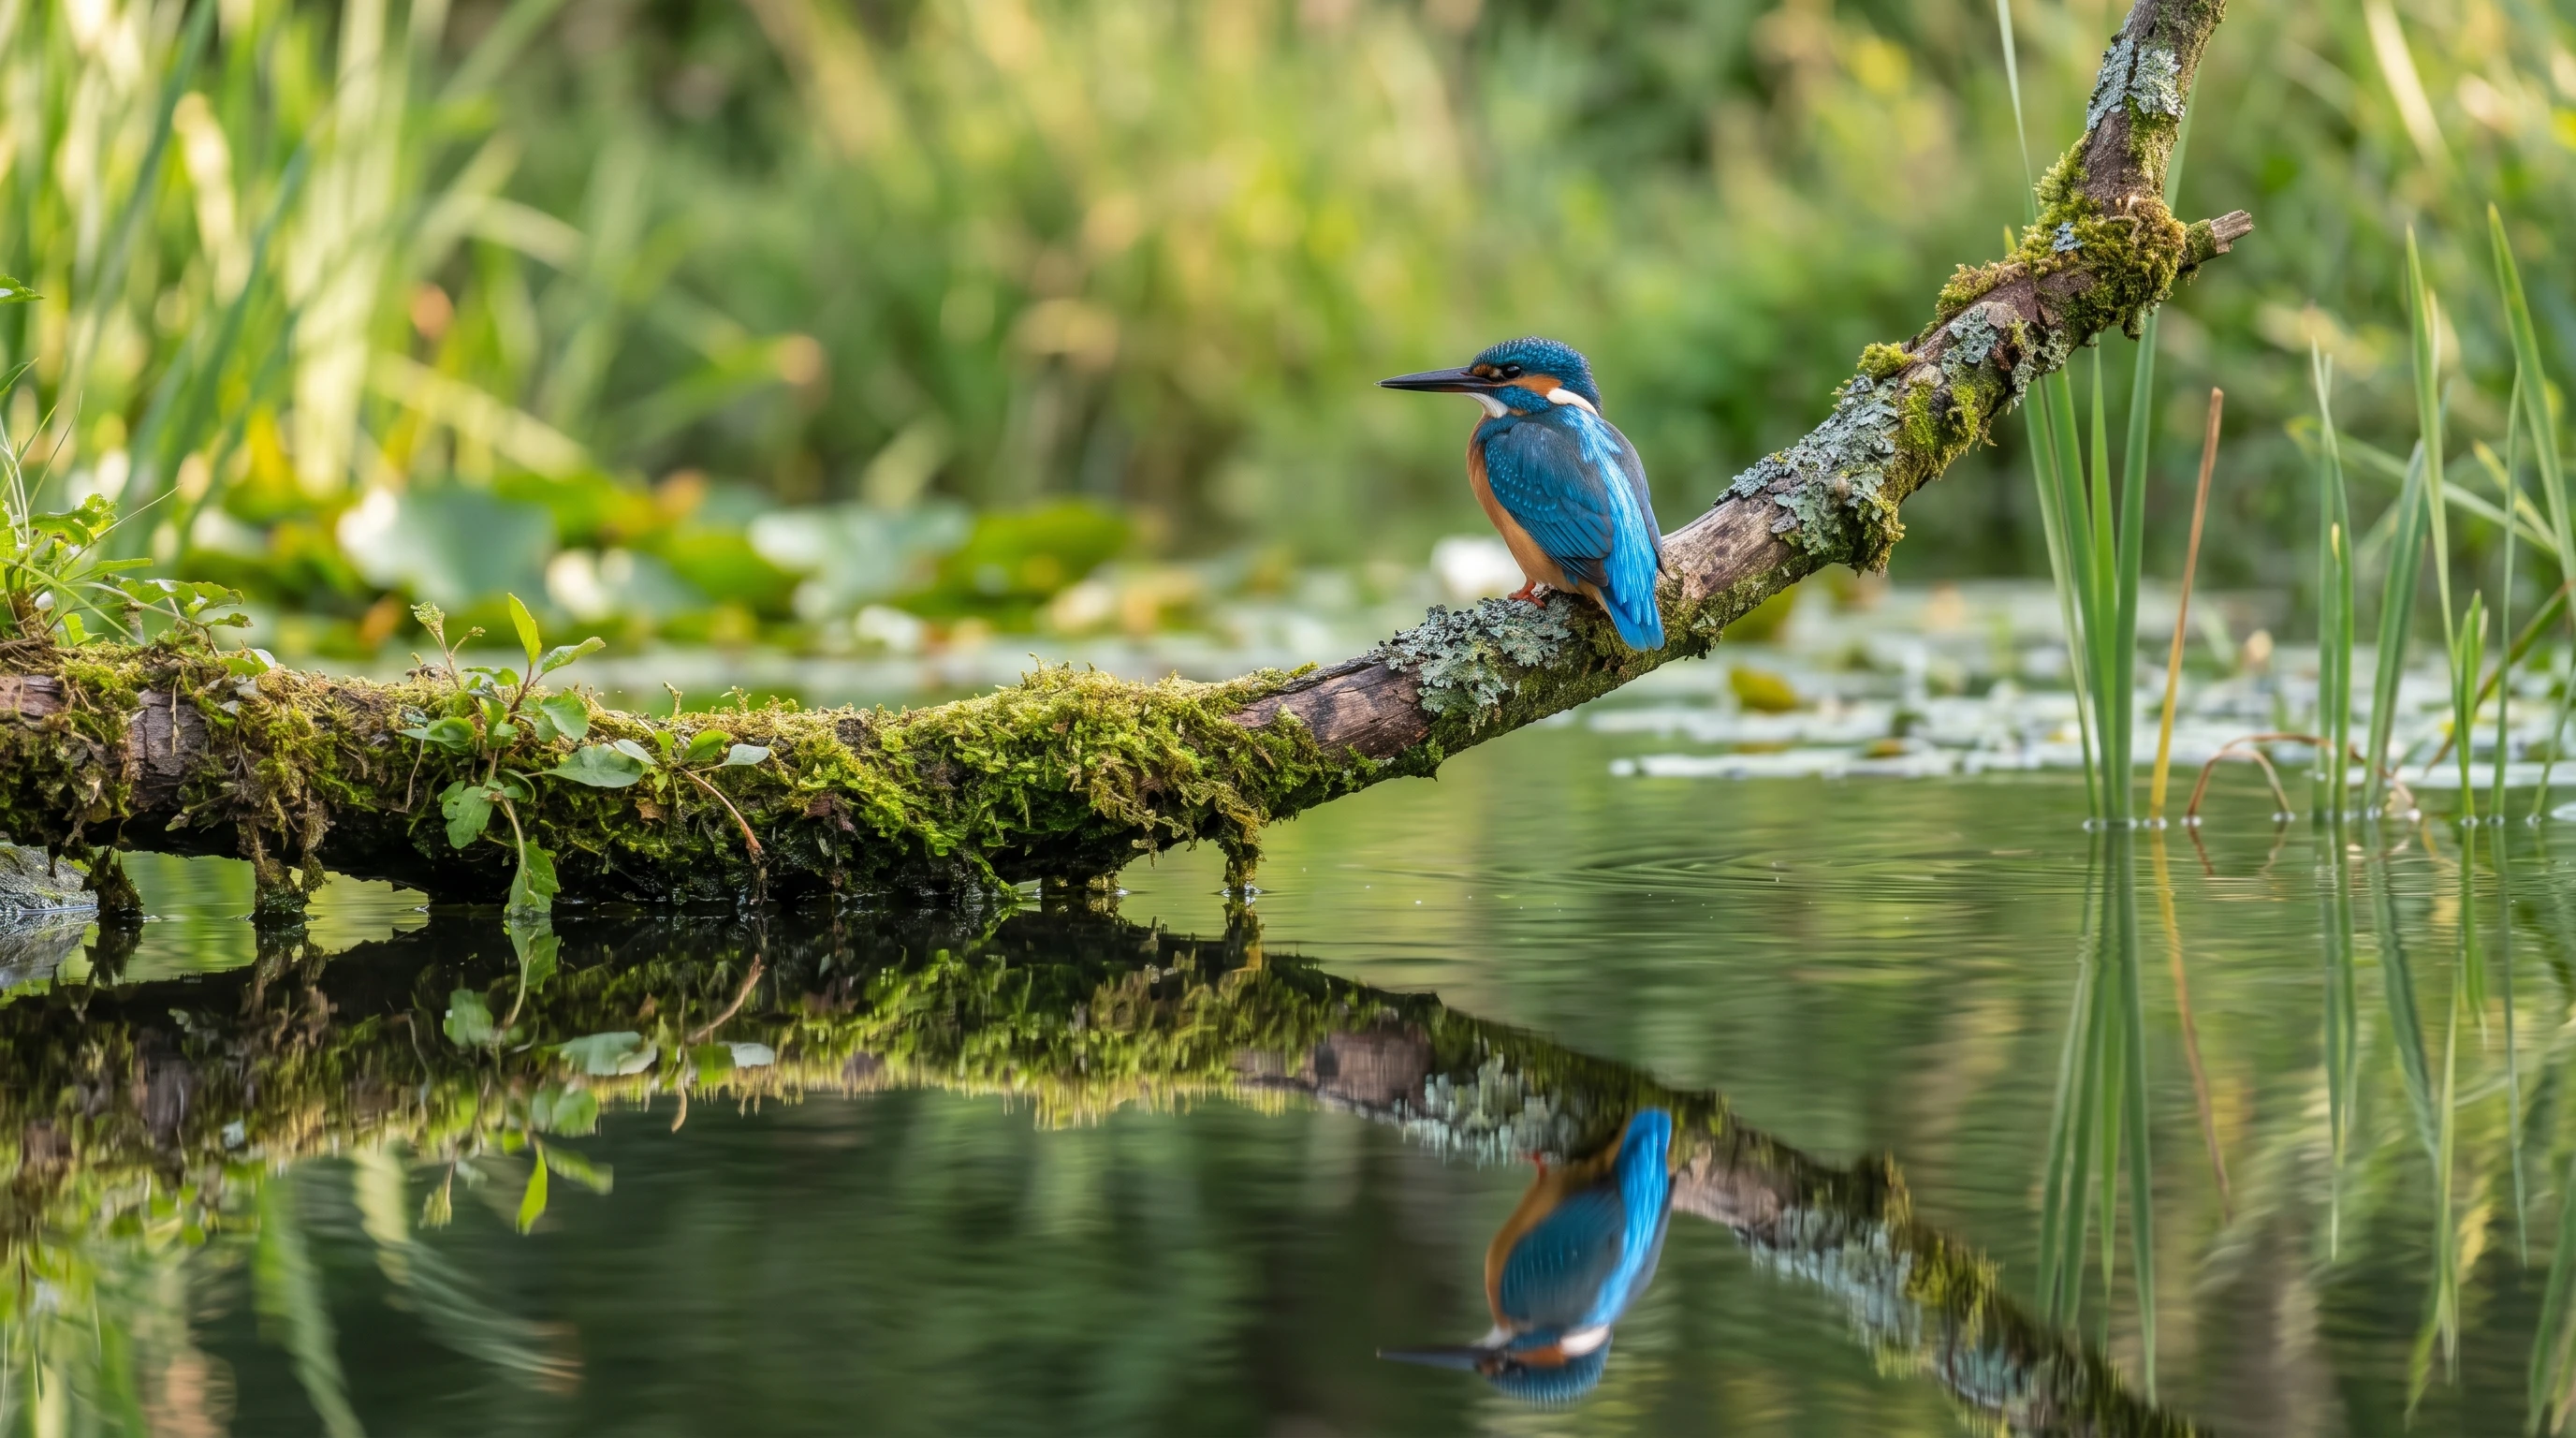
Understanding Kingfisher Behavior
Knowing how kingfishers act makes a world of difference when you are out in the field.
You will notice they spend most of their hunting time perched, scanning the water for tiny fish.
Some species even hover briefly before darting down at high speed.
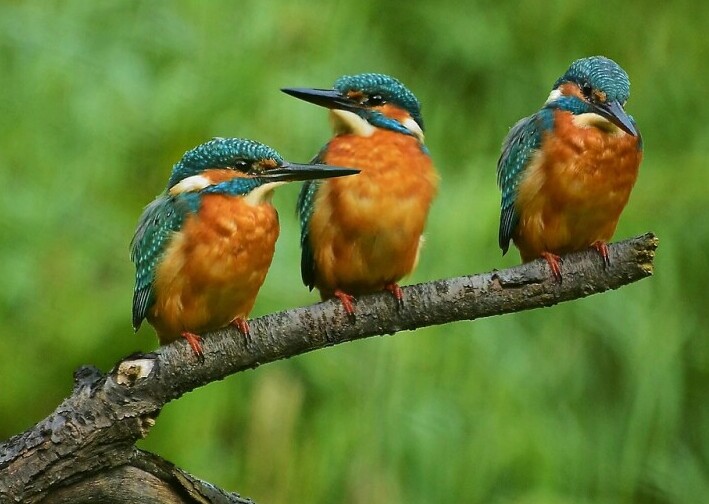
Always keep an eye on a spot where the bird returns after a jump—the kingfisher is a creature of habit, and it will often return to the same perch between hunting attempts.
This predictable behavior means you can set up your camera and be ready to shoot whenever they launch into action.
- Perch and dive style: Most kingfishers watch for prey from a branch or low stick near the water.
- Hovering before striking: Some kingfishers briefly hover mid-air before diving.
- Repeats favorite perches: You will catch on to their go-to branches if you visit the same site often.
- Lightning fast dives: Their diving and returning pattern is quick and demanding on your reflexes.
Understanding these details can really give a boost to your chances of getting great kingfisher shots instead of just “almost got it” blurs.
Learning to predict their moves, and waiting patiently, pays off for capturing unique and vivid moments in the wild.
Best Locations and Timing for Kingfisher Photography
Top Places to Find Kingfishers
Kingfishers usually live around lush riverbanks, lakes, and slow-moving ponds—anywhere they can find small fish with clear access to water.
Some species like mangroves or estuaries, but the classic spots are quiet country streams and waterside patches.
Spending time around these habitats helps you track down their favorite perches and observe daily routines.
- Rivers with overhanging branches
- Lakes and ponds with reed beds
- Wetlands and estuaries
- Undisturbed fishing spots away from heavy foot traffic
When to Go for the Best Shots
Early morning is my favorite time to photograph kingfishers—the light is soft, the water is calmer, and the birds tend to be most active searching for breakfast.
Late afternoon is another sweet spot, especially for catching warm, golden lighting.
Avoid the harsh midday glare if you are after rich color and less shadow hassle.
Timing Tips for the Calendar
During the breeding season, kingfishers are noticeably more active and visible, zipping back and forth to feed their chicks.
In colder months, you might get clearer backgrounds, with less tangled vegetation and better visibility near the water’s edge.
You can also use this time to experiment with various camera settings in search of the look you want.
Camera Settings for Stunning Kingfisher Photos
Shutter Speed
- Perched shots: Start with 1/1000–1/1600s for sharp results.
- Dive or action shots: Kick it up to 1/2500–1/4000s. Kingfishers are a blur otherwise!
Aperture
- For background blur: f/4–f/5.6 gives you that creamy, soft backdrop so the bird stands out.
- For detail: Try f/6.3–f/8 if you want everything tack sharp (great for perched shots).
ISO
- Adjust according to the available light. Do not be afraid to push ISO up if the light is low. A bit of grain is way better than motion blur, especially for action shots.
Focus Mode
- Continuous autofocus (AF-C): The best option, set a single point or small zone right on the bird’s eye for the sharpest images.
Burst Mode
- Use your camera’s fastest burst mode so you are capturing multiple frames in the split second of a dive. It is almost impossible to catch the perfect moment otherwise.
Best Lenses and Gear for Kingfisher Photography
Recommended Lenses (400–600mm Telephotos)
- Kingfishers are shy and would not let you get close, so a 400mm or 600mm telephoto lens is my go-to. A 100-400mm zoom is useful for flexibility, while a 500mm or 600mm prime can bring extra sharpness at a distance.
Zoom vs Prime Lenses
- Zooms: Great for beginners or anyone who likes flexibility in framing shots without moving.
- Primes: Offer sharper images and wider apertures but are heavier and less flexible. Worth it for pure image quality.
Support Gear
- Tripod with gimbal head: Makes tracking moving birds a lot smoother, especially during long stakeouts.
- Monopod: More portable, good for mobility if you are walking and shooting.
Extra Accessories
- Fast SD or CFexpress cards for burst shooting
- Extra batteries, since birds do not wait for you to recharge
- Camouflage gear (hat, cover, or portable hide) to blend in with your surroundings
- Lens rain covers for protection since kingfishers hunt in all kinds of weather
Pro Techniques for Catching the Dive
Pre-Focus on the Perch
I like to set focus on the favorite perch before the dive happens.
This helps your camera lock in the instant the kingfisher pushes off.
You will improve your chances of catching the action by being proactive rather than reactive.
Track the Action
Follow the bird with your camera as soon as it tenses up.
Watch for the head bob and focused stare.
Be ready for sudden movement and stay on your target for the best sequence shots.
Use Burst Mode
Capture the exact entry, splash, and exit. It often takes 10–20 frames in seconds to grab a whole dive sequence seamlessly.
Reviewing bursts afterward helps you pick out the most eye-catching frames.
Watch for Cues
Look for that shoulder twitch or focused gaze—it means the dive is about to happen.
This anticipation makes all the difference for high-action shots and ensures you don’t miss a split-second opportunity.
Getting Into Position: Smart Fieldcraft Tips
Hide and Stay Low
Use natural cover, like tall grass or low shrubs, to break up your outline.
Kingfishers are skittish, so the less you move, the better your chances.
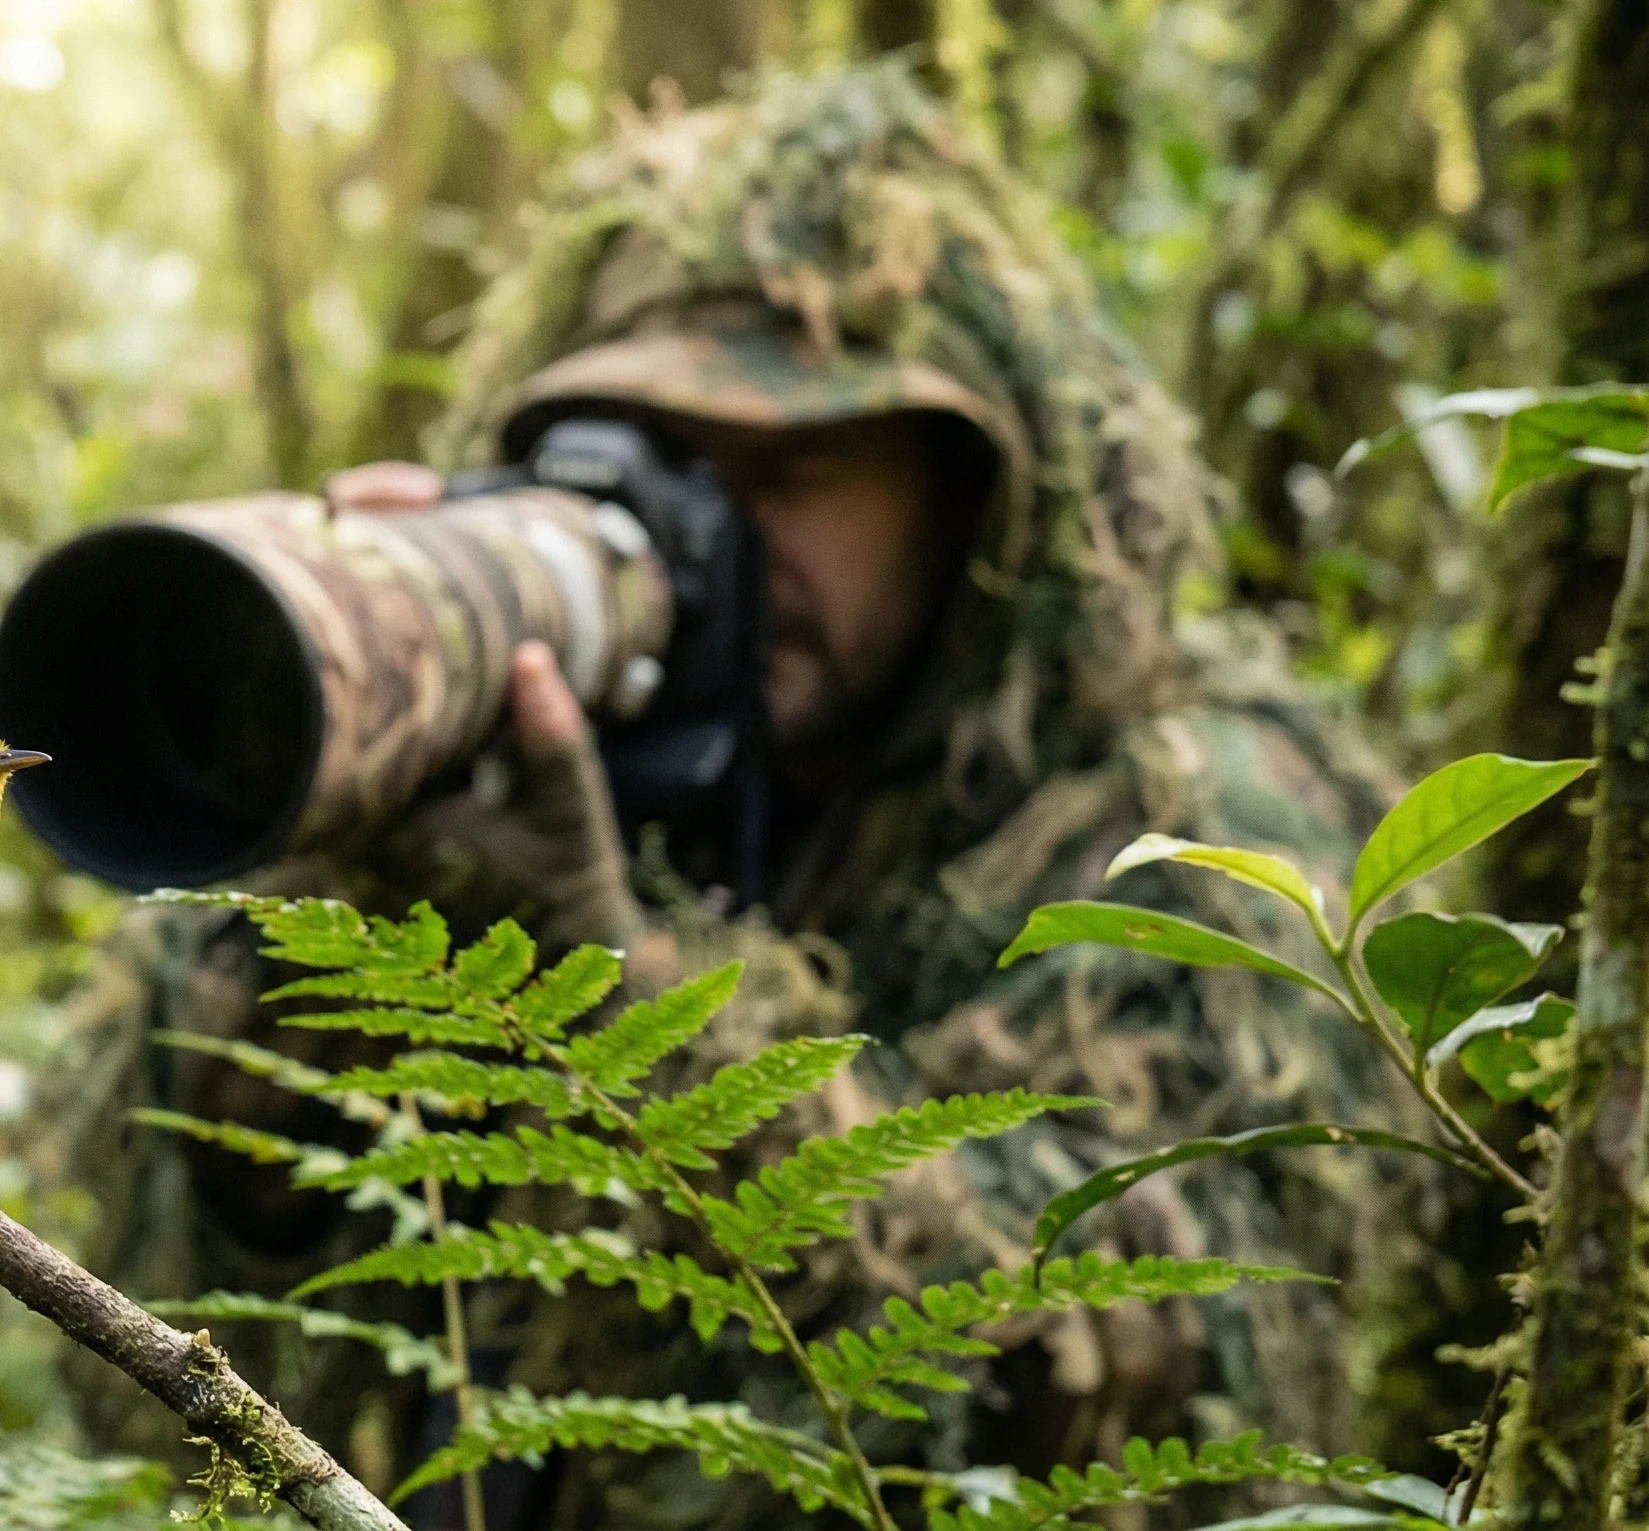
Keep Your Distance
Birds feel threatened if you approach too closely.
Sit back and let the telephoto lens do the work so you will capture natural, relaxed behavior without disturbing the wildlife.
Let Them Come to You
Patience matters more than chasing.
If you are quiet and still, the kingfisher may even ignore you after a while, giving you much longer shooting opportunities.
Sometimes the best shots come when you just wait and observe.
Lighting Set-ups That Work Best
The Magic of Golden Hour
Early and late light brings out the kingfisher’s intense blue and orange hues, producing eye-catching and very flattering images.
Try shooting with the sun behind you for the most vivid color and crisp feather detail.
Side Lighting
Raking light from the side highlights feather texture and adds richness to color.
This works especially well for perched birds and creates depth in your images.
Backlighting
Shooting toward the sun creates dramatic splashes and bold silhouettes as the bird emerges from the water.
Play with exposure compensation to keep colors popping in these tricky situations.
Overcast Skies
Cloudy weather softens shadows and evens out exposure.
Blues and oranges still pop, but you do not have to worry about blown highlights or tough shadows.
Overcast days are perfect for high-key kingfisher portraits.
Composing Photos That Stand Out
Eye Level Angles
Getting your lens at the same height as the bird builds connection and intensity in your photos.
I always try to get as low as the bank or hide lets me. Shooting eye to eye adds something special to every shot.
Clean Backgrounds
Smooth water or distant reeds make the bird stand out.
Watch out for clutter like branches or bright patches behind your subject.
Simpler backgrounds keep focus squarely on your kingfisher.
Using Reflections
Still water can create awesome mirror images, effectively doubling the visual impact of your shot.
Seek out quiet stretches of water and wait for the kingfisher to perch or hunt nearby.
Capturing Action
The splash, the fish toss, the moment the kingfisher surfaces—these are the shots that grab attention and get the most engagement.
Focus on moments that tell a story, not just static portraits.
Common Pitfalls to Dodge
- Shooting with too slow a shutter speed, which leads to motion blur that is often unrecoverable.
- Standing too far away; detail is lost if your subject is tiny in the frame.
- Messy, distracting backgrounds that take away from the subject.
- Missing focus on the bird’s eye. Always prioritize sharp eyes for a lively, engaging look.
- Not knowing the bird’s behavior, leading to missed moments and wasted opportunities.
Beginner Kingfisher Practice Plan
- Start with perched shots where the action is slow and predictable. Practice focusing and composition before adding in complex movements.
- Move on to catching hover shots if your local species hovers. This will push your tracking and timing skills.
- Graduate to diving sequences as you get more comfortable—do not expect to nail the perfect shot right away, but savor the progress you make.
- Return to the same spot often. You will spot patterns and improve your hit rate quickly by learning the bird`s habits.
Quick Kingfisher Gear And Settings Checklist
- Shutter: 1/2500s or faster for action shots
- Aperture: f/4–f/8 for rich backgrounds and detail
- Continuous autofocus (AF-C) plus burst mode engaged
- Telephoto lens (400mm or longer)
- Tripod or gimbal for added stability
Frequently Asked Questions
What is the best shutter speed for photographing kingfishers?
For perched shots, 1/1000–1/1600s is a good option. For action shots like jumps or wingbeats, 1/2500–1/4000s keeps everything sharp. Faster is generally better with these speedy birds.
How do I photograph a kingfisher diving?
Pre-focus on the perch, use continuous auto-focus, and set your camera to its highest burst rate. Watch for the bird’s cues just before it jumps in so you are ready to press and hold the shutter as soon as it makes a move. Timing is everything; quick reflexes help you seize the split-second moment.
What lens is best for kingfisher photography?
A telephoto in the 400mm–600mm range is ideal. Many photographers like a 100-400mm zoom for flexibility, but a fixed 500mm or 600mm prime can yield sharper images and extra reach.
Where can I find kingfishers to photograph?
Look for them near quiet rivers, lakes, ponds, and marshes. Spend time watching local waterways and try to spot their favorite perches. These birds are surprisingly loyal to certain branches and fishing spots, so patience pays off.
Final Thoughts
Kingfisher photography brings together patience, technique, and timing for a truly rewarding experience.
Mastering the basics, getting familiar with their habits, and making the most of natural light will help you score those beautiful photos that plenty of bird photographers dream about.
Stick with it, practice regularly, and check out some of my other tips on making the most of light, tracking elusive birds, and my bird photography starter guide if you want to dig into the art of wildlife shooting.
Stay patient, enjoy the process, and your collection of kingfisher photos will only grow better with time.
Leave a question or comment in the box below and I will be happy to get back to you!!!
Happy bird photographing!!!!!!
Kingfishers are the most glorious birds, but incredibly difficult to get a good shot of. I tried once and I think it got spooked as I got too close and flew off. How magnificent to be able to catch a good shot of this bird in flight and even better as it catches its prey.
Thank you for all these great tips, but most important thing to have is a lot of patience and time when trying to capture that perfect shot.
Hi Michel!
You’re so right — kingfishers are glorious and infuriating.
That “spooked and gone” moment is basically a rite of passage.
I have done the exact same thing more times than I can count.They have incredible eyesight and a very clear comfort radius.
If you breach it, they are off.
The trick I learned the hard way: never walk straight at them. They read direct approach as a predator.
Instead, move in a slow arc, 10-15 meters at a time, and stop often to “become part of the scene.”
If it stops fishing to watch you, you are too close.For flight + prey shots, patience really is everything, but so is pre-focusing.
Find the perch it hunts from — they almost always return to the same 2-3 spots.
Pre-focus on that perch, set a fast shutter 1/3200+, and wait. Let the bird come to your frame instead of chasing it.
And you nailed the most important tip in your last line.
Time + patience beats expensive gear every single time with kingfishers.
Thanks for sharing your experience — every missed shot teaches us for the next one.
You will get it.
Best regards
Raymond